
Code copied!

Wall Panel Buying Guide: How to Choose & Install Acoustic Wood Panels
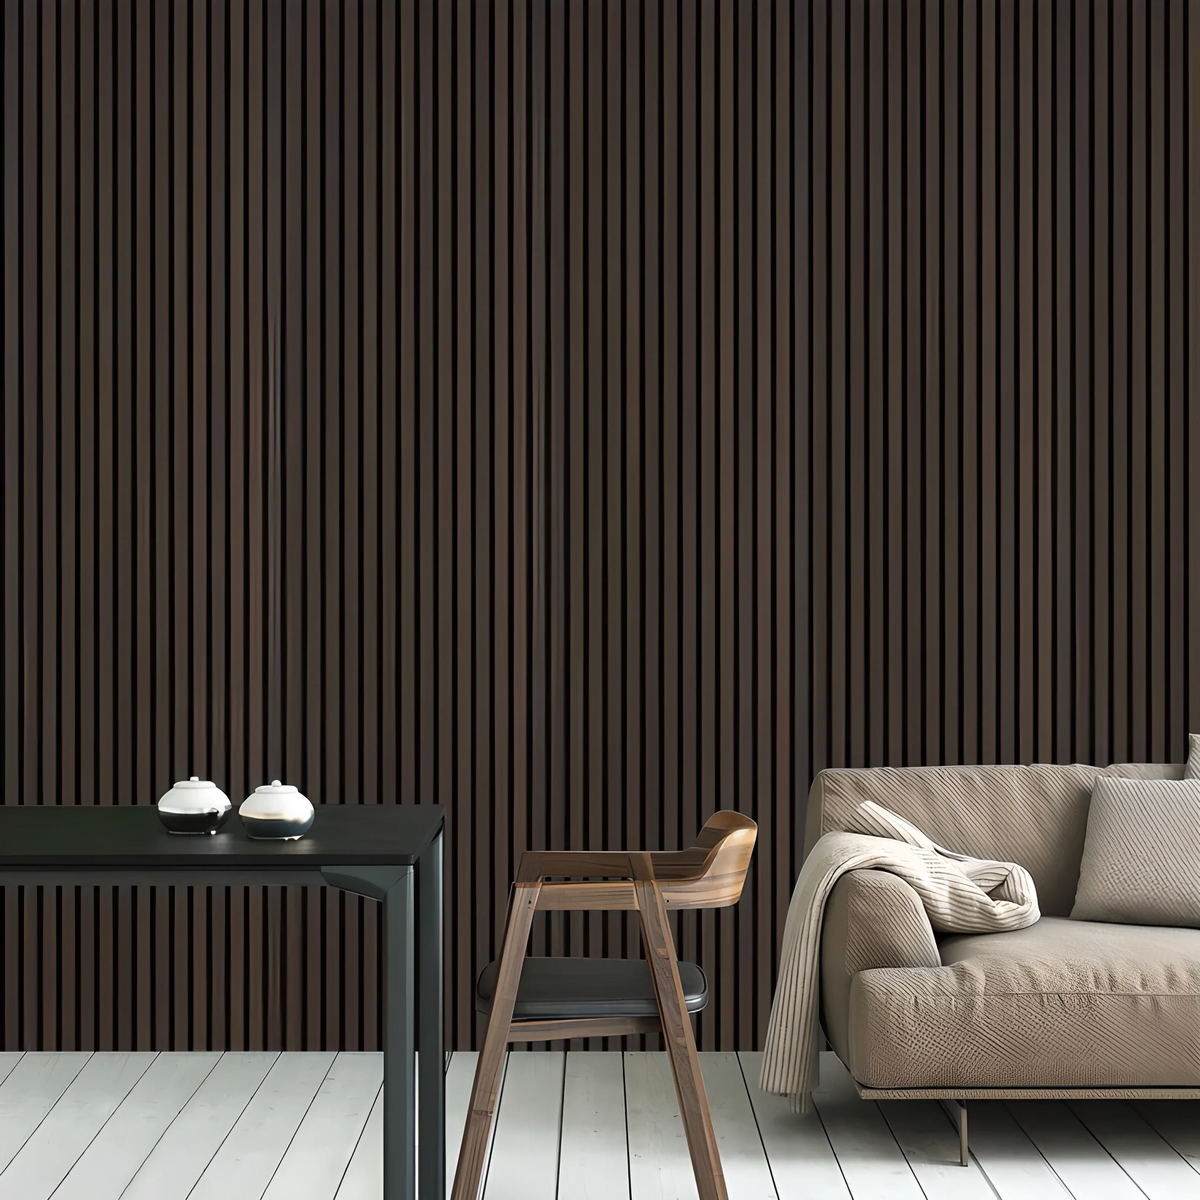
Wall panels have become one of the most effective ways to transform interior spaces, adding depth, warmth, texture, and acoustic performance. Slatted acoustic wood wall panels are not only visually striking but also practical, helping to reduce echo and improve sound quality in bedrooms, living rooms, home offices, and commercial spaces.
At My Forever Furnishings, our acoustic wall panels are designed to be stylish, affordable, and easy to install, making them a perfect solution for modern homes and professional interiors.
Acoustic wood wall panels offer one of the quickest and most impressive upgrades you can make to your home. With the right preparation and installation, they deliver long-lasting beauty, improved acoustics, and a true designer finish.
Explore the full acoustic wall panel collection at My Forever Furnishings and transform your space with confidence.
Where to Use Acoustic Wall Panels
Acoustic wood wall panels are highly versatile and suitable for a wide range of applications:
- Feature walls in living rooms and lounges
- Media walls and TV feature walls
- Bedroom headboard feature walls
- Hallways and entrance areas
- Home offices and gaming rooms
- Ceilings for sound control
- Commercial spaces such as offices, hotels, and retail stores
These panels improve both the aesthetics of your space and overall acoustic comfort.

Preparing Your Wall for the Best Results
Preparation is key to achieving a flawless, long-lasting installation.
Before fitting your panels:
- Ensure the surface is clean, dry, and structurally sound
- Repair cracks, chips, or damaged plaster
- Remove loose paint, wallpaper, or debris
- Sand uneven areas to create a smooth bonding surface
A properly prepared wall ensures stronger adhesion and a premium, seamless finish.

Tools and Materials You Will Need
Having the correct tools ready makes the installation quick and stress-free:
- Tape measure for accurate sizing
- Pencil for marking cut lines
- Spirit level to ensure straight alignment
- Fine-tooth saw for precise trimming
- Sandpaper or sanding block for smooth edges
- Construction adhesive for strong bonding
- Adhesive gun for clean application
- Rubber mallet for gentle positioning
- Power drill for added fixing
- Black matt 38mm screws for secure fitting
Using the right tools helps you achieve a clean, professional installation.

Allowing Panels to Acclimatise
Once delivered, leave your panels in the room where they will be fitted for at least 48 hours. This process allows them to adjust to temperature and humidity, reducing the risk of:
- Warping
- Shrinking
- Expanding after installation
Store the panels flat to maintain their shape.
Styling Tips for Acoustic Wall Panels
Make your wall panels stand out with smart styling:
- Use vertical panels to make ceilings appear higher
- Horizontal panels can visually widen a room
- Dark wood finishes create a dramatic, luxury look
- Light oak and neutral tones create calm, Scandinavian-inspired interiors

Step-by-Step Guide to Installing Wall Panels
Installing acoustic wall panels is designed to be straightforward and DIY-friendly.
Step 1: Measure and plan
Calculate the total area by multiplying the wall height by width. Work out how many panels you need and plan your layout before starting.
Step 2: Position the first panel
Use a spirit level to ensure your first panel is straight. This is the foundation for the entire wall.
Step 3: Apply adhesive
Use strong construction adhesive in a zigzag pattern across the back of the panel.
Step 4: Fix to the wall
Press the panel firmly into place and use a rubber mallet to gently secure it.
Step 5: Extra fixing if required
For ceilings or high-traffic areas, secure panels with black matt screws through the felt backing.

Cutting Panels for a Perfect Fit
Walls are rarely perfectly square, so trimming is often required.
You may need to cut panels to fit around:
- Plug sockets and light switches
- Windows and door frames
- Skirting boards and corners
Recommended tools:
- Handsaw for detailed cut-outs
- Sabre saw for precision trimming
- Circular saw for longer, straight cuts
Always sand cut edges to maintain a refined finish.
